
Tech Tip Tuesday - How to fix stripped threads on your motorcycle
By: Ari Henning Courtesy: Revzilla
It’s a terrible feeling: You’re tightening a bolt on your bike and the wrench suddenly gets a little easier to turn. Your stomach sinks, your cheeks get hot. You’ve stripped the threads. That hole is pooched, but don’t despair. You have several options for making things good as new, or perhaps even better than new. From installing a Heli-Coil to (maybe?) restoring things with J-B Weld, we’ll walk you through your options for fixing stripped threads.
It’s not that bad…
If the threads are just a little maligned, say because you started to cross thread a bolt, then you can try to straighten them with a bolt or a thread chase. If it’s a through hole, try running an intact, lubricated bolt in from the backside. Or, use a thread chaser, which is specifically designed to straighten and reform crooked threads as well as clean rusty or dirty threads.
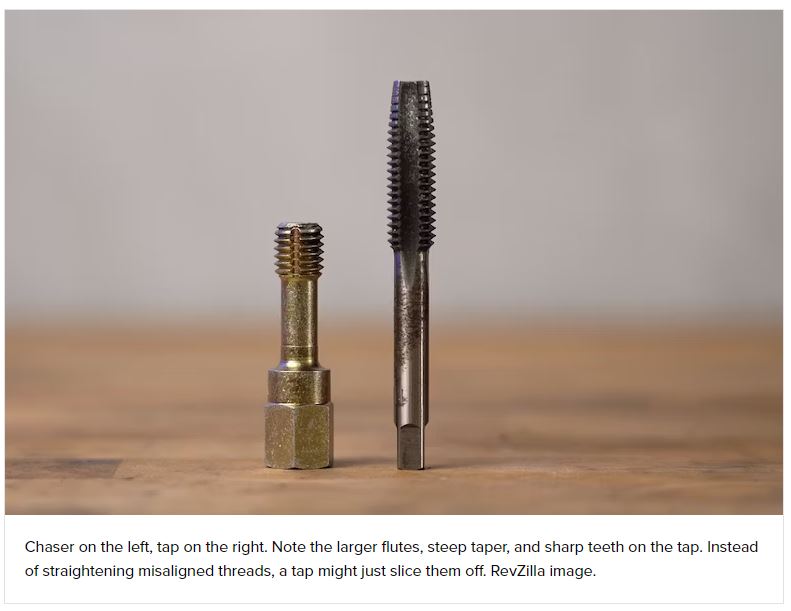
To use a thread chaser, you oil the tool and spin it in, making sure it’s square to the workpiece. Honestly, keeping the tools and hole orthogonal is the hardest part of any thread-repair process, so take your time, triple-check your angle, and go slowly.
Heli-Coil
If the threads are too far gone to be realigned, then the most common repair is the installation of a Heli-Coil. These coiled stainless steel wire inserts restore the hole to its original size and thread pitch, and kits are readily available at auto parts stores for $15 to $50, depending on the size and whether or not it comes with a specially sized drill bit and tap.
To install a Heli-Coil, you drill out the hole to the appropriate diameter (with the included drill bit, or based on the size listed on the kit’s tap), then tap the hole to prepare it for the insert, spin in the Heli-Coil to the proper depth (a quarter to half a turn below the surface of the hole), and then finally break off the tang at the bottom of the coil and fish it out.

Heli-Coils are affordable, easy to come by, and fairly easy to install, and if you use them in a soft material like aluminum, the repair will be stronger than stock. I’ve used Heli-Coils a bunch and most of the time they’re a good solution for stripped threads, but there are some applications where you may need to use a Time-Sert.
Time-Sert
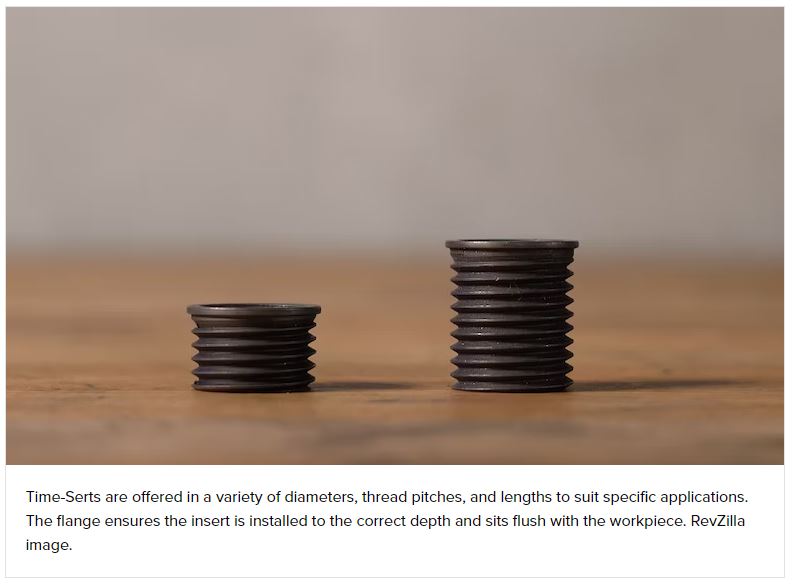
A Time-Sert is a solid-body insert, rather than a coiled wire like a Heli-Coil. These are usually a special-order item and they’re more expensive, like $75 to several hundred dollars for a kit. But what I like about Time-Serts is that there’s a flange at the top that sits flush with the workpiece. That makes them ideal for holes where a tight seal is critical, like a spark plug or drain plug hole.
As with Heli-Coils, you install Time-Serts by first drilling out the damaged hole, followed by a pass with the included counterbore to cut a seat for the insert’s flange. Then you tap the hole, put an insert on the installer, and screw it in. When the flange bottoms out the installation tool will tighten up in a way that may give you flashbacks of stripping the threads in the first place. Don’t worry, that’s the tool flaring the threads at the bottom of the insert so it’s locked in, and once it’s easy to turn again you’re good — just unscrew the tool and you’re done.
For drain plugs, I like to apply a thin smear of oil-resistant RTV silicone to the underside of the flange to ensure things are properly oil tight.
But what about J-B Weld?
If Heli-Coils and Time-Serts sound too complicated and expensive, you might be tempted to fix things with J-B Weld. After all, the package says it can be drilled and tapped.
I’ll start off by saying that J-B Weld is great stuff. It’s a powerful two-part epoxy that works wonderfully for all sorts of projects, and I’d definitely turn to it to scab a cracked clutch cover on the trail or fix the threads in a plastic turn signal housing. But when it comes to repairing threads that are meant to take some torque, J-B Weld is a no-go.

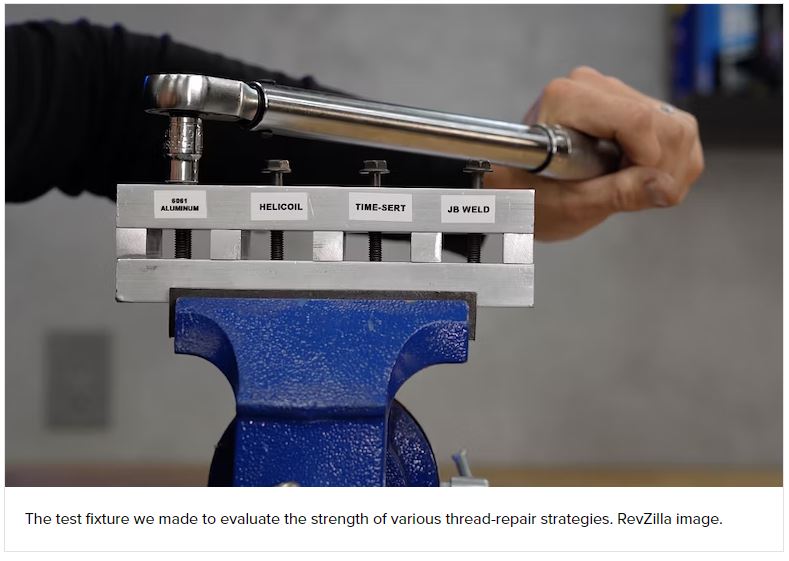
The threads in the aluminum held firm, with the bolt giving way at 20 foot-pounds. The Heli-Coil was stronger than the bolt as well, with another fastener failure at 20 foot-pounds. The Time-Sert pulled out at 14 foot-pounds, which was a little surprising, but it’s still twice the maximum rated torque for a fastener of this size. Then, there’s J-B Weld, which stripped out right away at just 3.5 foot-pounds.
Again, J-B Weld has its uses and is a staple in my shop and the tool kit I take on road trips and adventures, but it’s not strong enough to create a reliable repair, even on something as light duty as a side-cover bolt.
Tips and tricks
Whichever technique or product you go with, I’d suggest practicing the repair on a piece of scrap metal or a junk part before pointing a drill bit at your beloved motorcycle. All kits come with a handful of inserts, so don’t be afraid to use a few while getting used to the process.
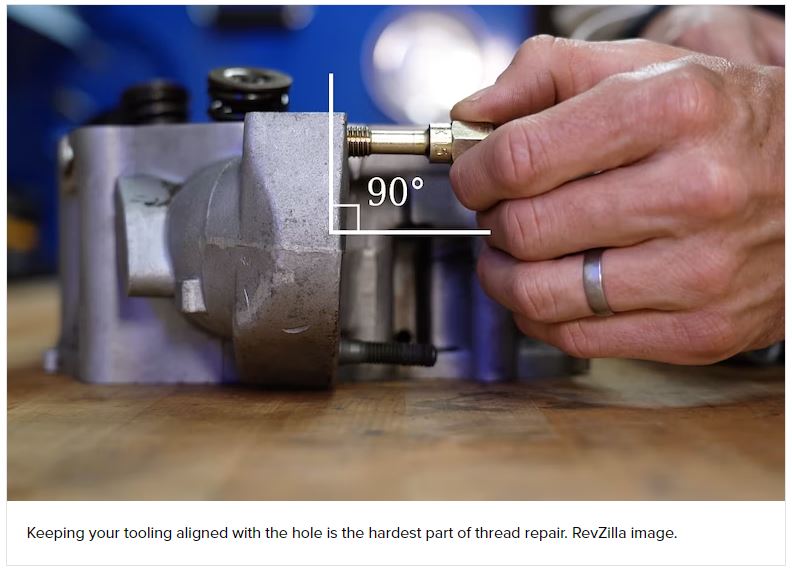
As I stated earlier, keeping the drill and tap perpendicular to the workpiece — so that when all is said and done, the fastener clamps square and true — is the most important and challenging aspect of the job. Again, take your time, and double check your alignment. Life is going to get a lot harder if you botch the repair, though it is possible to extract Heli-Coils and Time-Serts if things go wrong.
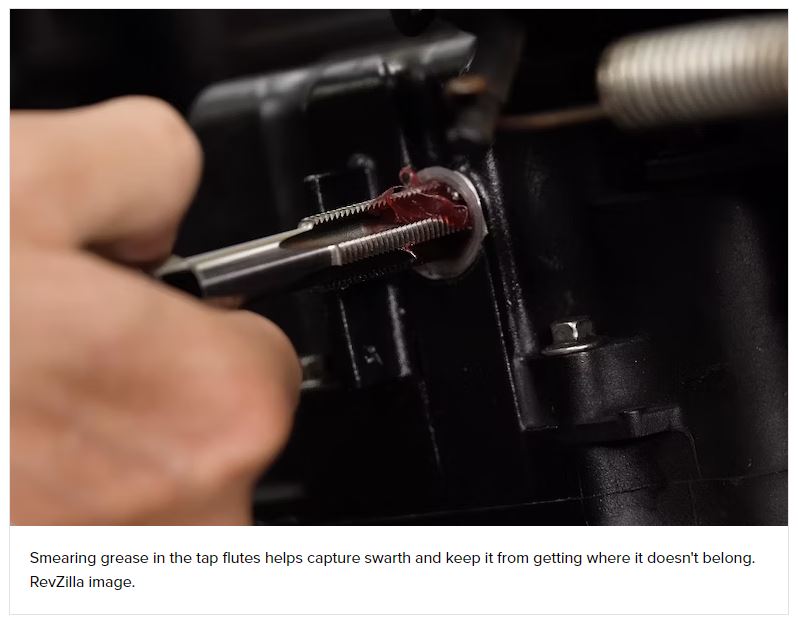
Finally, you might be wondering how to keep metal shavings out of places they don’t belong while drilling and tapping. Filling the tool’s flutes with grease is an effective method of capturing debris, but it’s not guaranteed to catch everything. For drain-plug and other sump repairs, you can flush the crankcase with old oil. The oil filter will handle anything that remains. For spark-plug holes, removing the head is the only way to guarantee a clean repair. It’s a royal pain, but it’s what you’ve got to do.
Final thoughts
To summarize, know that all is not lost when you strip a bolt hole on your bike. If you can’t restore the threads with a chase, then you’ll want to use a Heli-Coil, which is affordable and usually readily available, or a Time-Sert, which is a more refined repair but also more expensive.
Regardless of the route you choose, congrats on investigating a solution, because knowing how to fix messed-up threads is a valuable skill. And if this article has revealed that you don’t have the ambition or confidence to tackle the job, that’s fine too. Any competent mechanic or machinist will be able to handle the repair for you.
By: Ari Henning Source: Revzilla
#techtiptuesday | #motorcyclerepair | #StrippedThreads | #HeliCoil #TimeSert | #JBWeld